PAN means Permanent Account Number. Every Indian Resident who attain the age of 18 Years or above must have PAN. If you want to do any important financial stuff like opening a bank account, investing in the stock market, or paying taxes, you need a PAN card. This PAN card is like your financial ID. It helps the government keep track of your money-related activities and ensures that everyone pays their taxes properly. Now, getting a PAN card used to take a lot of time and paperwork. But recently, the government introduced Instant e-PAN, which makes getting a PAN card super quick and easy.
The Instant e-PAN service is available to all Individual taxpayers, who have not been allotted a Permanent Account Number (PAN) but possess Aadhaar. This is a pre-login service, where you can:
- Obtain digitally signed PAN in electronic format, free of cost, with the help of Aadhaar and your mobile number linked with Aadhaar,
- Update PAN details as per Aadhaar e-KYC,
- Create e-Filing account based on e-KYC details after allotment / updation of PAN, and
- Check status of pending e-PAN request / Download e-PAN either before or after logging in to the e-Filing portal.
Prerequisites for Instant PAN Card
- Individual who has not been allotted a PAN
- Valid Aadhaar and mobile number linked to Aadhaar
- User not a minor as on date of request; and
- User not covered under the definition of Representative Assessee u/s 160 of the Income Tax Act.
Step-by-Step Guide
Generate New e-PAN
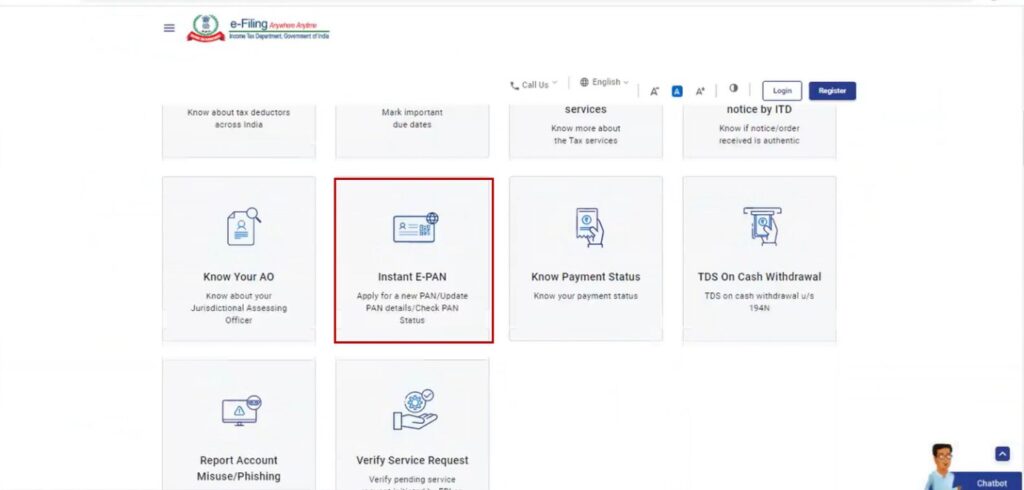
Step 1: Go to the e-Filing portal homepage, click Instant e-PAN.
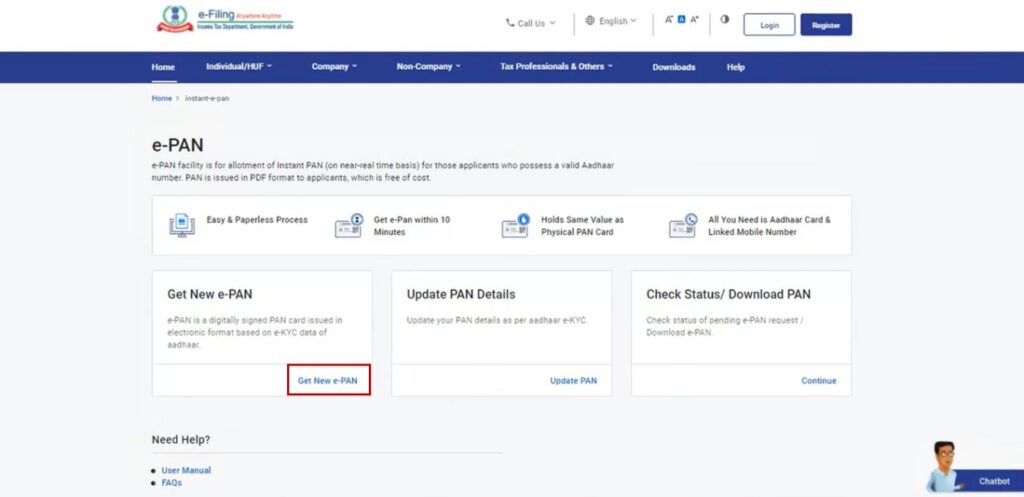
Step 2: On the e-PAN page, click Get New e-PAN.
Step 3: On the Get New e-PAN page, enter your 12-digit Aadhaar number, select the I confirm that checkbox and click Continue.

Note:
- If the Aadhaar is already linked to a valid PAN, the following message is displayed – Entered Aadhaar Number is already linked with a PAN.
- If the Aadhaar is not linked with any mobile number, the following message is displayed – Entered Aadhaar Number is not linked with any active mobile number.
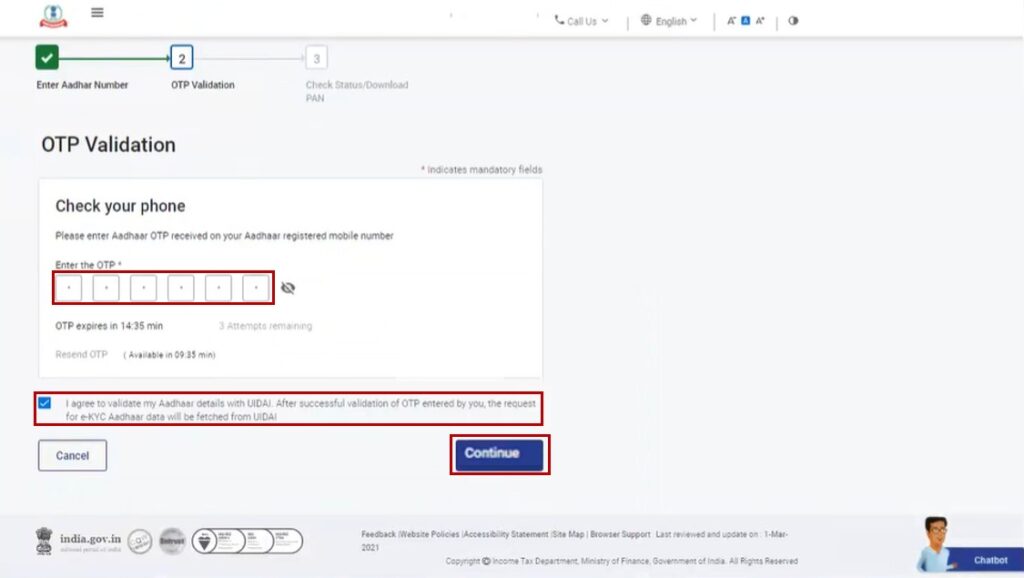
Step 4: On the OTP validation page, click I have read the consent terms and agree to proceed further. Click Continue.
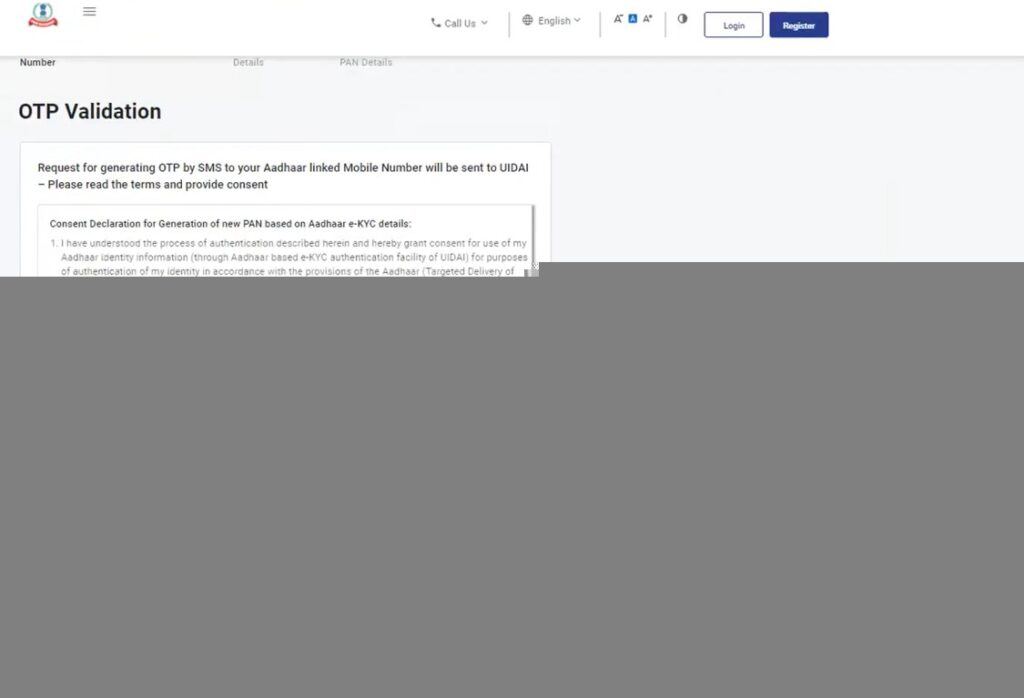
Step 5: On the OTP validation page, enter the 6-digit OTP received on the mobile number linked with Aadhaar, select the checkbox to validate the Aadhaar details with UIDAI and click Continue.

Note:
- OTP will be valid for 15 minutes only.
- You have 3 attempts to enter the correct OTP.
- The OTP expiry countdown timer on screen tells you when the OTP will expire.
- On clicking Resend OTP, a new OTP will be generated and sent.
Step 6: On the Validate Aadhaar Details page, select the I Accept that checkbox and click Continue.

Note:
- Linking / Validating email ID (registered with your Aadhaar) is optional.
- If you have updated your email ID in Aadhaar but it has not been validated, click Validate Email. On the Validate Email ID page, enter the 6-digit OTP received on your mobile number linked with Aadhaar and click Continue.
- If you have not updated your email ID in Aadhaar, click Link Email ID. On the Validate Email ID page, enter the 6-digit OTP received on your mobile number linked with Aadhaar and click Continue.
On successful submission, a success message is displayed along with an Acknowledgement Number. Please keep a note of the Acknowledgement ID for future reference. You will also receive a confirmation message on your mobile number linked with Aadhaar.
How To download PAN card:
If you missed your Physical copy of PAN card or it is lost you can download it as discussed in below video
Update PAN details as per Aadhaar e-KYC
Step 1: Go to the e-Filing portal homepage and click Instant e-PAN.

Step 2: On the e-PAN page, click Update PAN.
Step 3: On the Update PAN Details page, enter your 12-digit Aadhaar number, select the I confirm that checkbox and click Continue.
Note:
- If the Aadhaar is already linked to a valid PAN, the following message is displayed – Entered Aadhaar Number is already linked with a PAN.
- If the Aadhaar is not linked with any mobile number, the following message is displayed – Entered Aadhaar Number is not linked with any active mobile number.
Step 4: On the OTP Validation page, enter the 6-digit OTP received on your mobile number registered with Aadhaar and click Continue.
Note:
- OTP will be valid for 15 minutes only.
- You have 3 attempts to enter the correct OTP.
- The OTP expiry countdown timer on screen tells you when the OTP will expire.
- On clicking Resend OTP, a new OTP will be generated and sent.
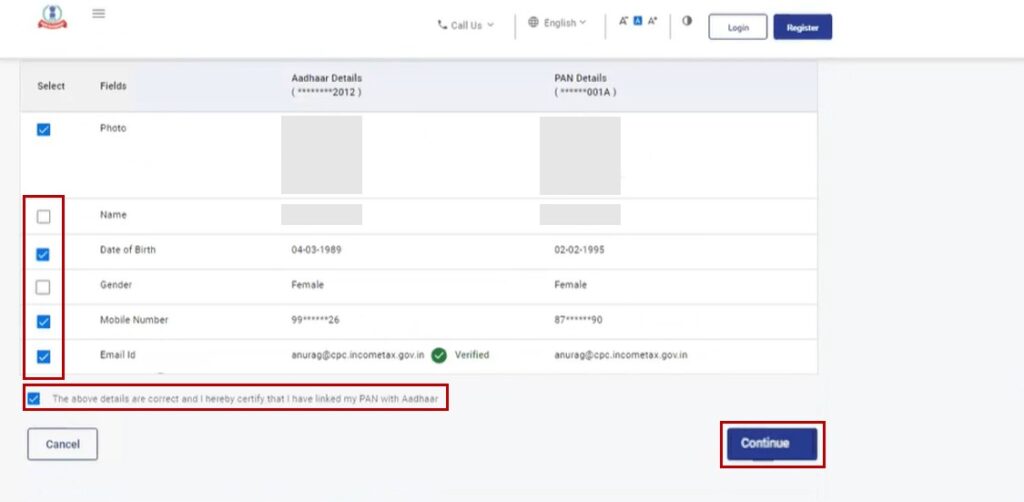
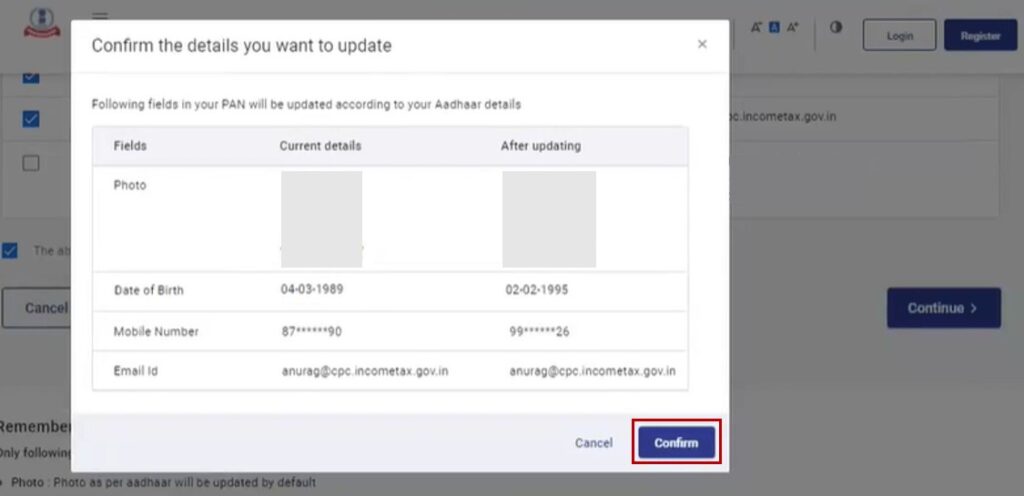
Step 5: After OTP validation, Aadhaar e-KYC details along with the details registered with PAN is displayed. Select the details to updated as per Aadhaar e-KYC by clicking on the respective checkboxes to be updated as per Aadhaar details and click Continue.
Please note that only the following details can be updated as per Aadhaar Details:
- Photo
- Name
- Date of Birth (If you only have year of birth in PAN, you will have to update it in Aadhaar before updating it in PAN).
- Mobile Number (It is updated by default)
- Email ID (You need to validate the email ID to be updated in PAN details)
- Address
Step 6: After selecting all the details which you want to update as per Aadhaar details, click Confirm.
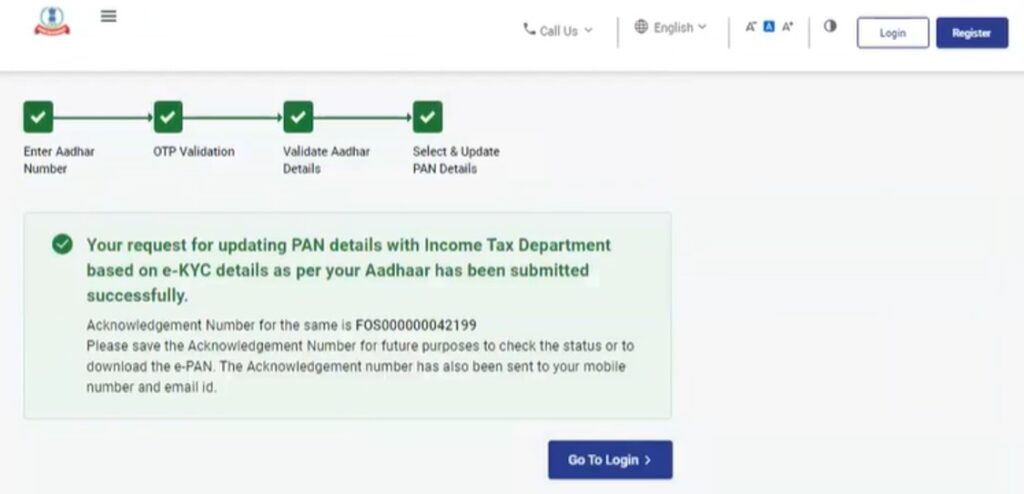
On confirmation, a success message will be displayed with an Acknowledgement Number. Please keep a note the Acknowledgement ID for future reference. You will also receive a confirmation message on your mobile number and email ID linked with Aadhaar.
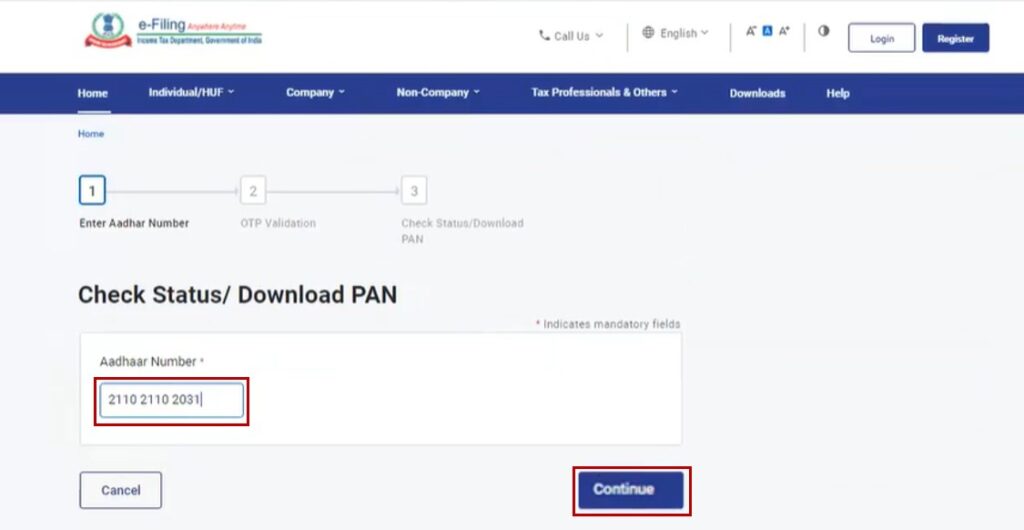
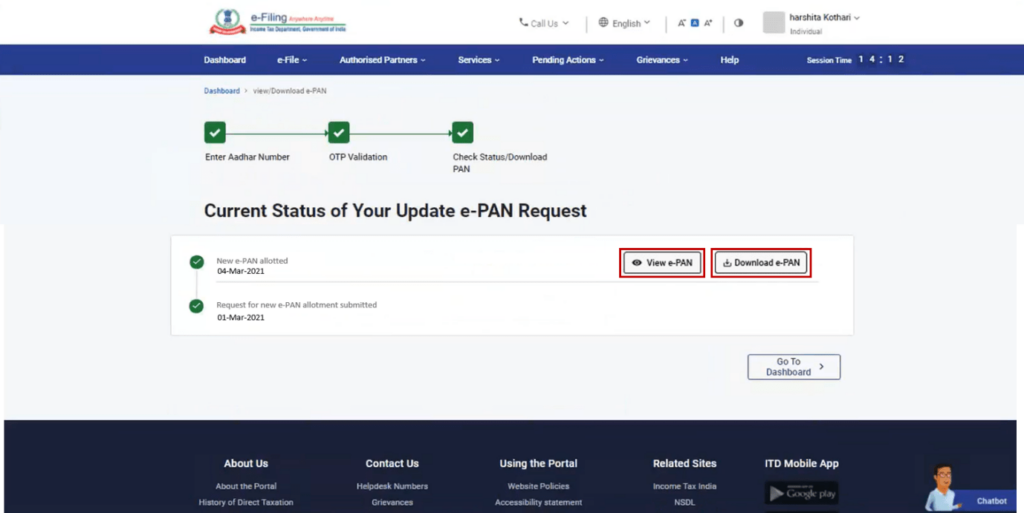
Check status of pending e-PAN request / Create e-Filing Portal account / Download e-PAN
Step 1: Go to the e-Filing portal homepage and click Instant e-PAN.
Step 2: On the e-PAN page, click Continue on the Check Status / Download PAN option.
Step 3: On the Check status / Download PAN page, enter your 12-digit Aadhaar and click Continue.

Step 4: On the OTP Validation page, enter the 6-digit OTP received on your mobile number registered with Aadhaar and click Continue.
Note:
- OTP will be valid for 15 minutes only.
- You have 3 attempts to enter the correct OTP.
- The OTP expiry countdown timer on screen tells you when the OTP will expire.
- On clicking Resend OTP, a new OTP will be generated and sent.
Step 5: On the Current status of your e-PAN request page, you will be able to see the status of your e-PAN request. In case the new e-PAN has been generated and allotted, click View e-PAN to view or Download e-PAN to download a copy. Click Create e-Filing Account to register on the e-Filing portal.
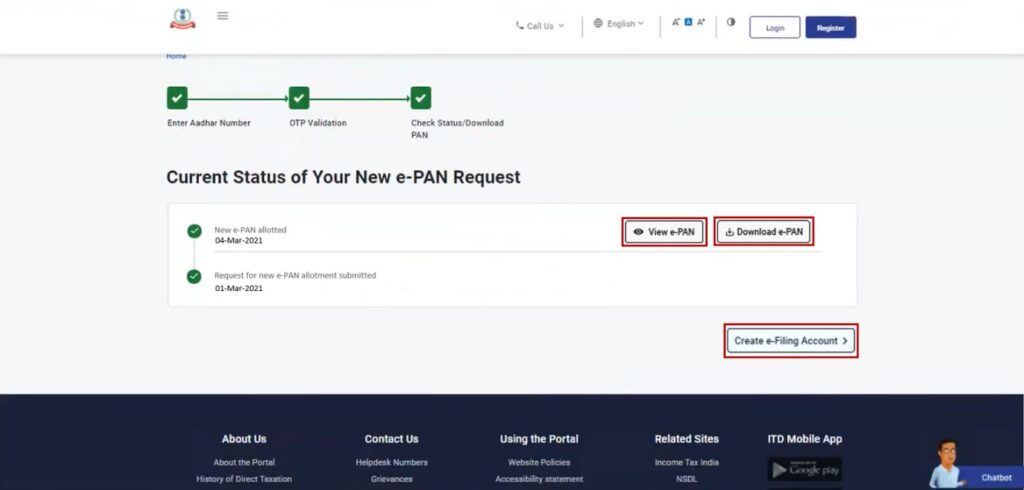
Note: If did not validate your email ID (as per your Aadhaar KYC) when generating your e-PAN, or while updating PAN details, it is compulsory to do so during registration.
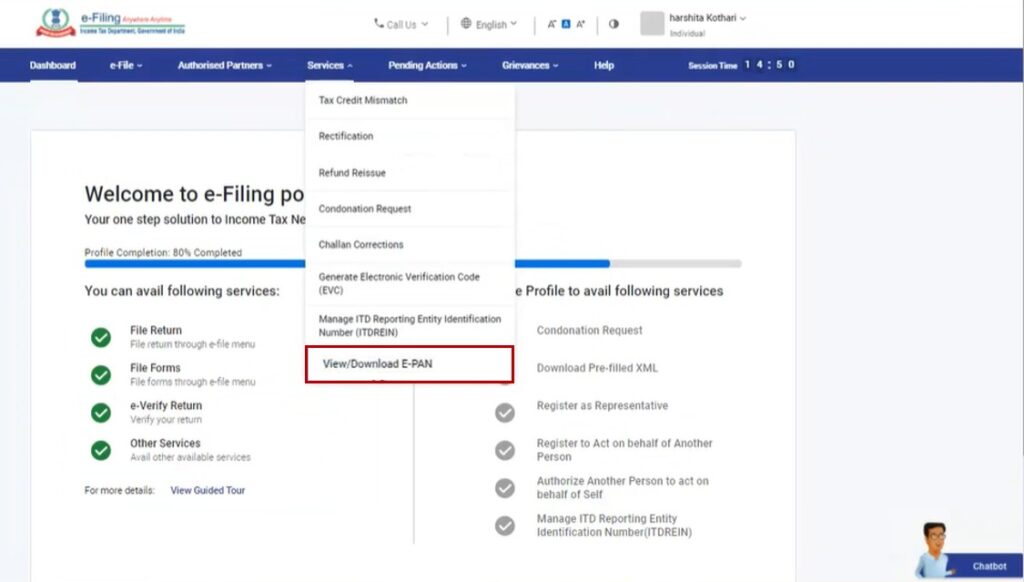
Download e-PAN Card– Post Login
Step 1: Log in to the e-Filing portal using your User ID and password.
Note: You need to Register yourself on the e-Filing portal after receiving e-Pan. Only after successful registration, you can log in to the portal. Go to the Register for e-Filing (Taxpayer) user manual to learn more.
Step 2: On your Dashboard, click Services > View / Download e-PAN.
Step 3: On the Enter Aadhaar Number page, enter your 12-digit Aadhaar number and click Continue.
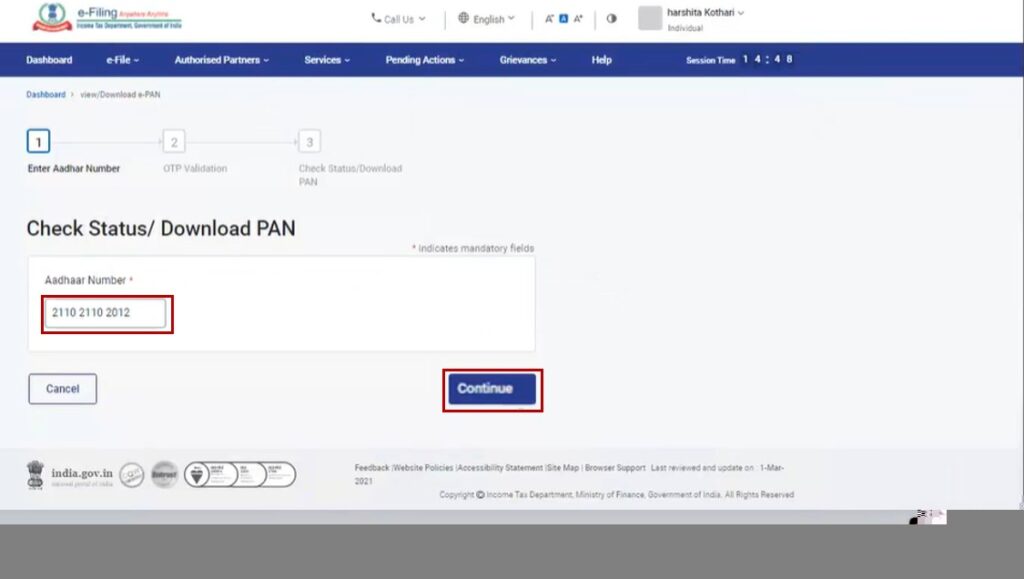
Step 4: On the OTP Validation page, enter the 6-digit OTP received on your mobile number registered with Aadhaar and click Continue.
Note:
- OTP will be valid for 15 minutes only.
- You have 3 attempts to enter the correct OTP.
- The OTP expiry countdown timer on screen tells you when the OTP will expire.
- On clicking Resend OTP, a new OTP will be generated and sent.
Step 5: On the View / Download e-PAN page, you will be able to see the status of your e-PAN request. In case the new e-PAN has been generated and allotted, click View e-PAN to view or Download e-PAN to download a copy.
Visit www.cagurujiclasses.com for practical courses